Deploying Windows AD With Ansible [ Part 1 - Template Config]

Overview
While my bread and butter is Linux Systems, I like to check in on the Windows side of things from time to time. As an aspiring cybersecurity professional, it's important to understand Windows considering it's large footprint in the corporate world. An important part of Windows on the server side is Active Directory, which allows for management of users, computers, DNS, and more. If an attacker compromises a Domain Controller, you're going to have a bad time. I've deployed AD environments manually before (see blog post here for reference), but recently I've thought to myself it'd be a fun and useful endeavor to automate the process.
I find it useful to break down big projects into multiple smaller projects to stay more motivated and focused so this project will be a series of blog posts, including:
- Provision a Windows Server Template
- Write Ansible Playbook to deploy Domain Controller and configure Domain
- Write Ansible Playbook to add users and computers to the Domain
I use Proxmox as a hypervisor in my homelab, and utilize templates to deploy servers so the first post in this series will deal with creating a template that makes running ansible against the machine a little bit easier, and allowing for ansible to communicate with the server.
I had an existing Windows Server 2022 template from a while back that I decided to update and change to suit my needs, but for the sake of being through, I'll walk through the basics of Windows installation since the process on Proxmox can be confusing for anyone starting out.
Making a Windows Template in Proxmox
(Source documentation for this section can be found here)
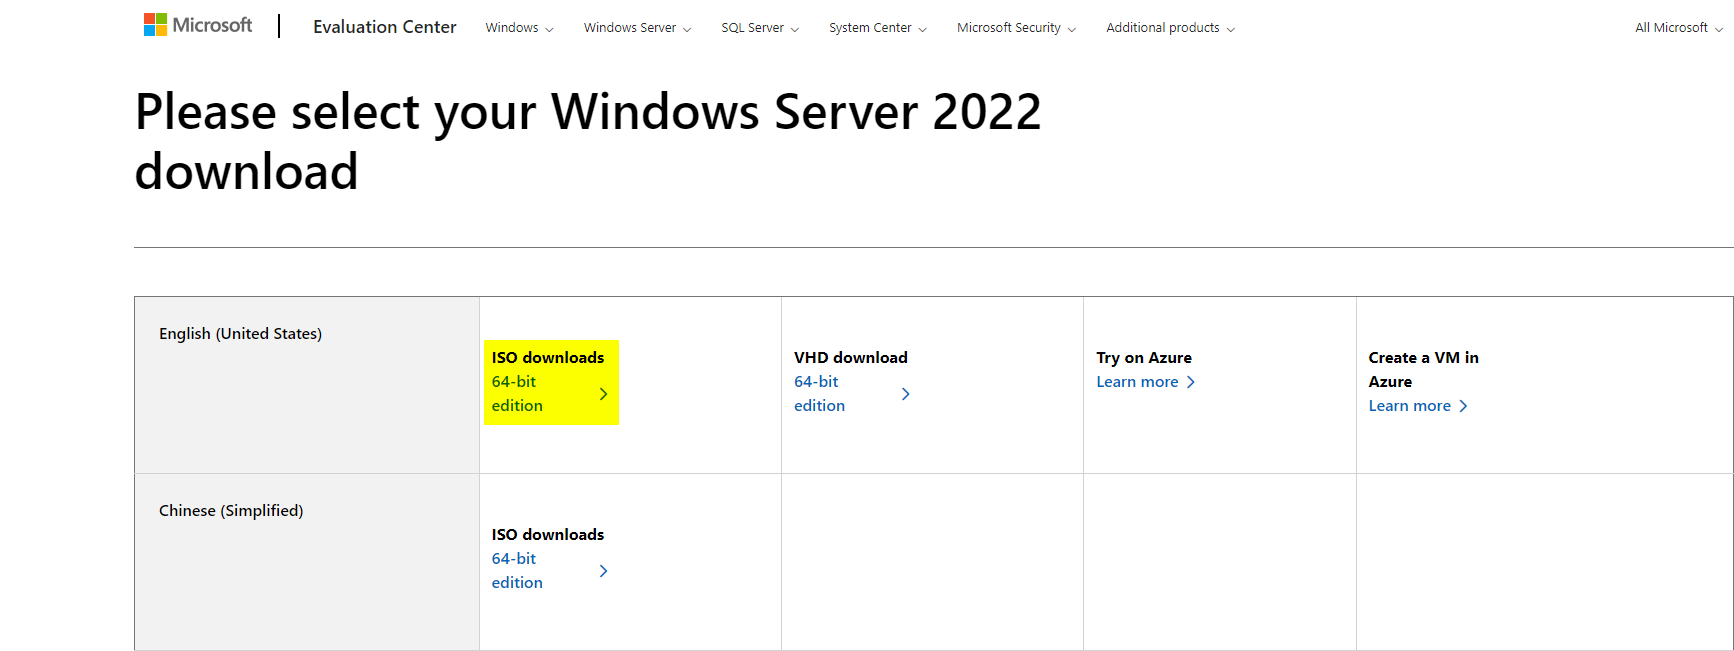
The first step is to grab the Windows server ISO and the Windows VirtIO Drivers. The Windows Server 2022 ISO can be downloaded from Microsoft. The page has you register for the free trial, and in my experience you can just fill the boxes with junk data before clicking 'Download Now' at the bottom of the page. After that, you'll get a page that allows you to select your download, which will be the 64-bit edition under ISO downloads.
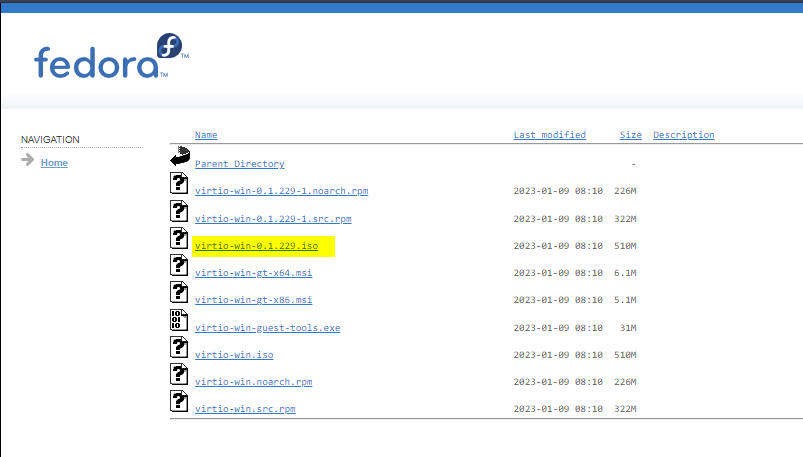
We also need the Windows VirtIO drivers which allow for us to get drivers for Windows to run properly in a VM (you cannot install Windows on Proxmox without these to my knowledge, I needed them to even get Windows to see the hard drive). The VirtIO drivers can be downloaded from here. Click the latest version, and grab the .iso file.
Now that we've got the files we need, we can go into Proxmox and install our template!
In Proxmox we need to create a new VM and select the options laid out in the best practices documentation located on the Proxmox wiki.
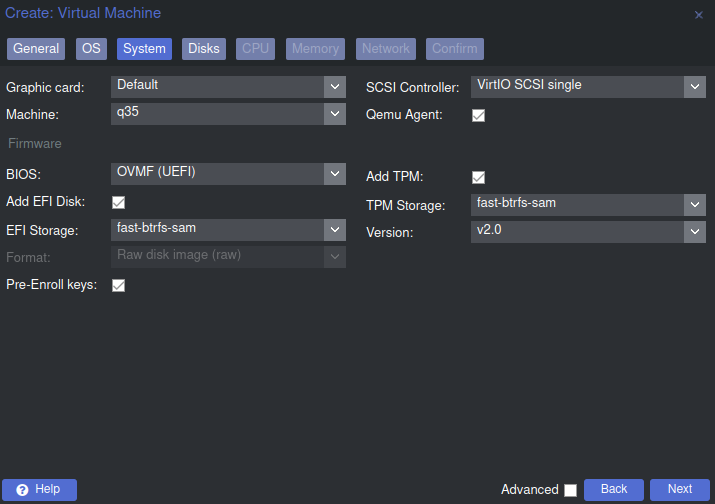
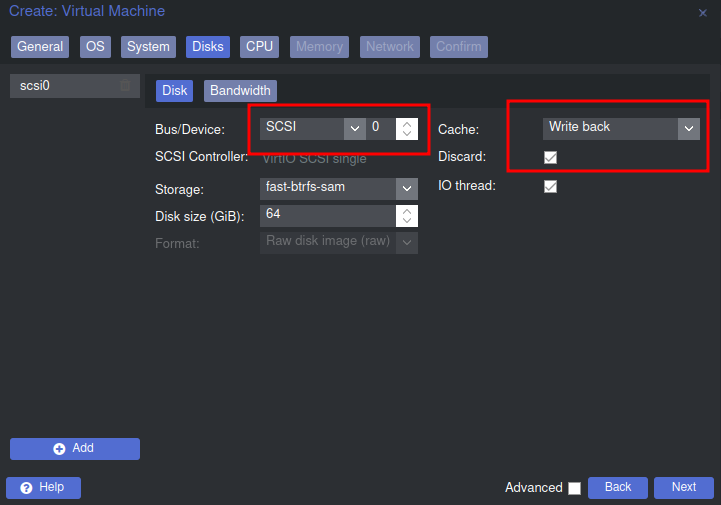
Those options include enabling 'Qemu Agent', and selecting the Win11/22 option in the OS tab. Also, selecting SCSI under the storage tab, checking 'Discard' for trim, and 'Write back' for cache.
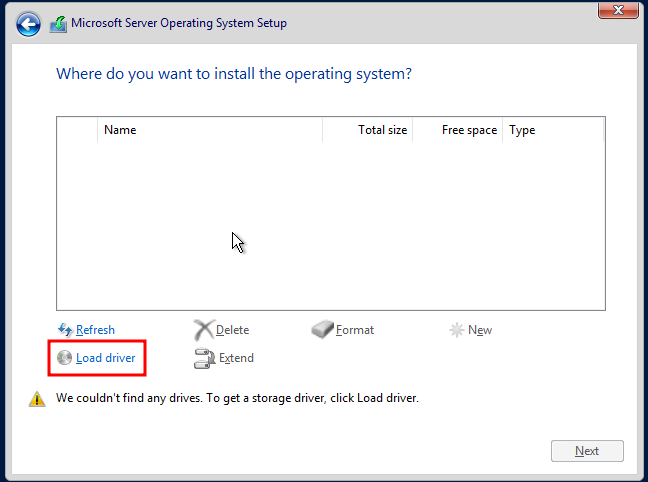
The last step before boot involves adding the drive that will hold the driver ISO. This step is important because without it, the installation won't be able to detect the hard drive that we'd like to install to. This is an easy enough process. Just select the VM, go to hardware, and add a CD/DVD drive. After that, boot the VM and install as normal! One quick note I'll mention is that the datacenter version is the one I'll use since it's made for virtualized environments. We'll do a custom install since we need to load drivers. Below is a screenshot of what to click to get the proper drivers:
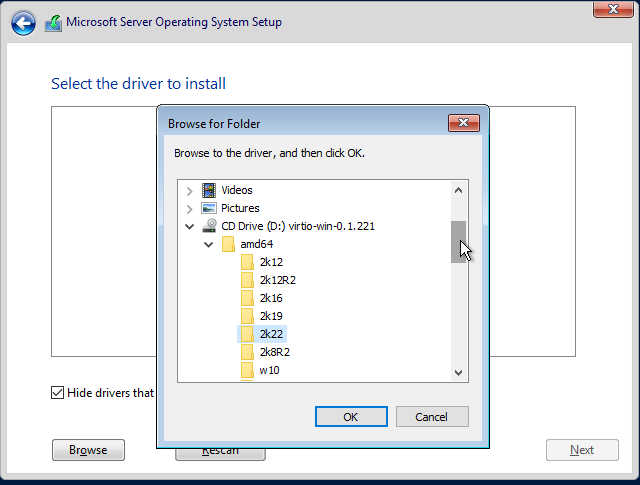
You'll select browse and navigate to the folder shown below and click ok. After that, you should be able to see the 'Red Hat VirtIO SCSI Pass Through Controller'.
After that you select the disk, click 'New' under that, next and install!
Post Install Configuration
In order to get ansible to work on Windows there's a few things that we need to do on both the Windows side and on our ansible control node.
Windows
In order to configure our Windows Server to communicate with Ansible and make things easier for ourselves, we'll do the following configuration after we set a password for the local admin user:
- Install missing drivers and guest-agent
- Configure Static IP
- Configure Hostname
- Configure Remote Access
- Disable Windows Firewall
- Enable CredSSP
- Update Windows
Missing Drivers
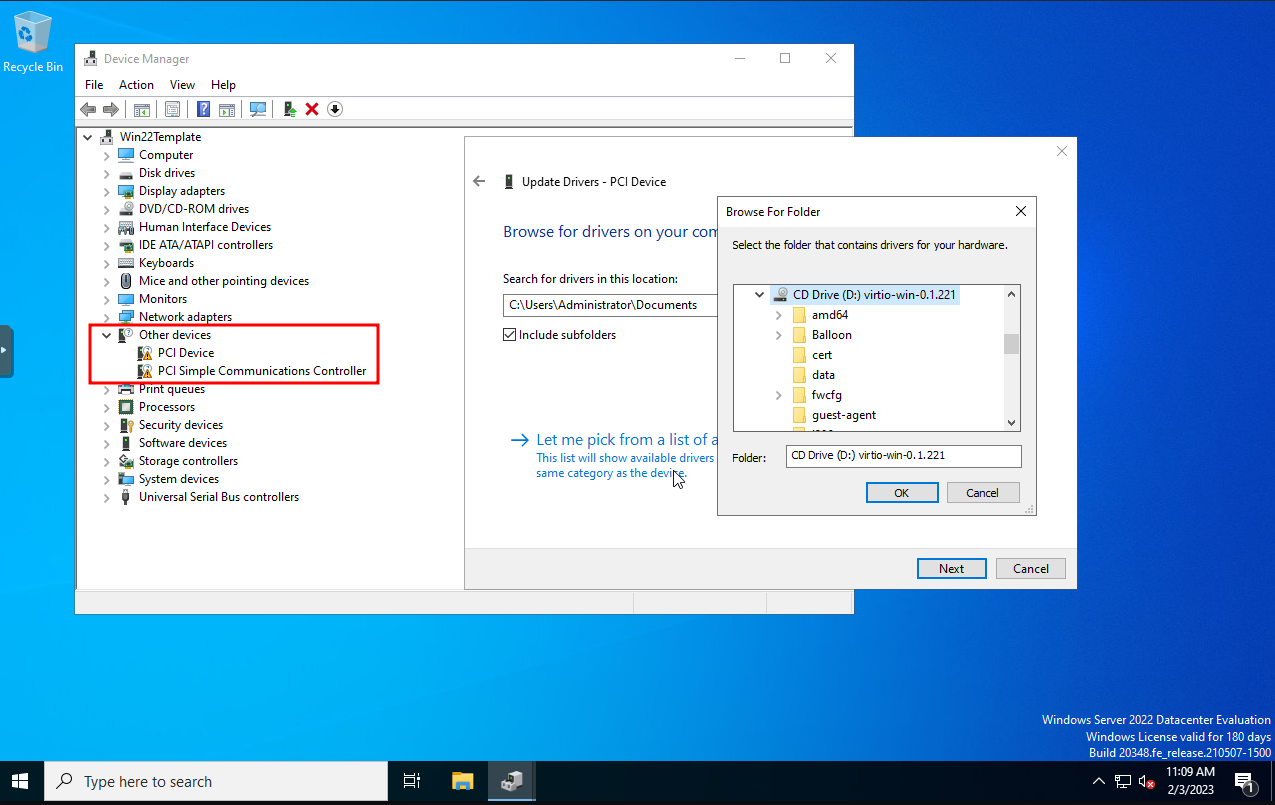
We can install the remaining drivers by opening up device manager right clicking on the devices with missing drivers, selecting 'Update drivers' and browing to the virtio ISO. You shouldn't have to navigate any further than the disk. Windows should detect the needed driver. You'll need to do this for each missing driver (in the picture there are two).
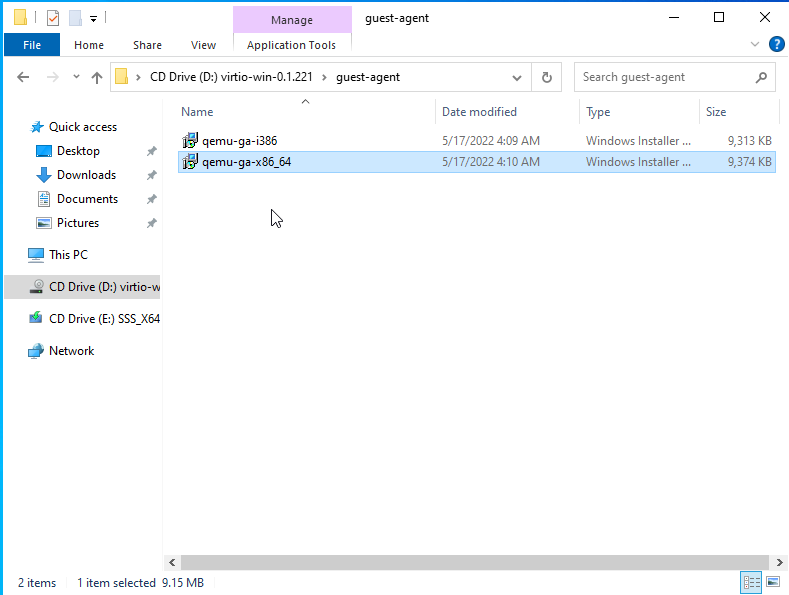
After that, go to the iso disk in file explorer and install the qemu-agent for 64bit version of Windows.
Networking
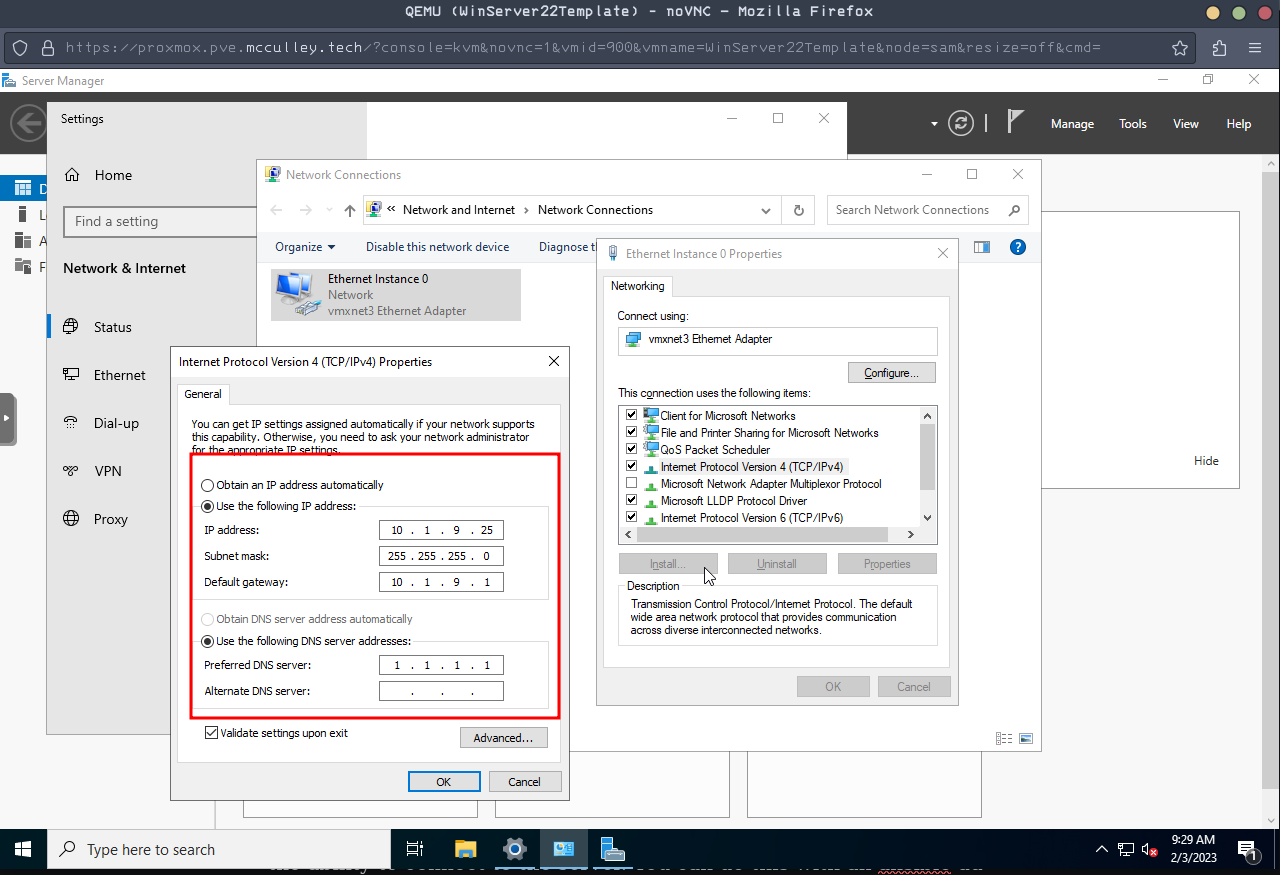
We can configure a static IP by right clicking the network icon in the bottom right, selecting 'Open Network & Internet Settings' -> 'Change adapter options', right clicking that and selecting 'Properties'. From there we can select IPv4 and click Properties again. Now we can set the static IP, DNS, and subnet.
You can give a hostname by searching 'Name This PC' in the search bar. Once there, click 'Rename this PC' to whatever you'd like. Changing the hostname requires a reboot, but I'd restart later after we make the other changes.
Remote Access
From the same window that you set the new hostname, you can also enable Remote Desktop. Otherwise search for 'Remote Desktop Settings' and toggle the option on.
Windows Firewall
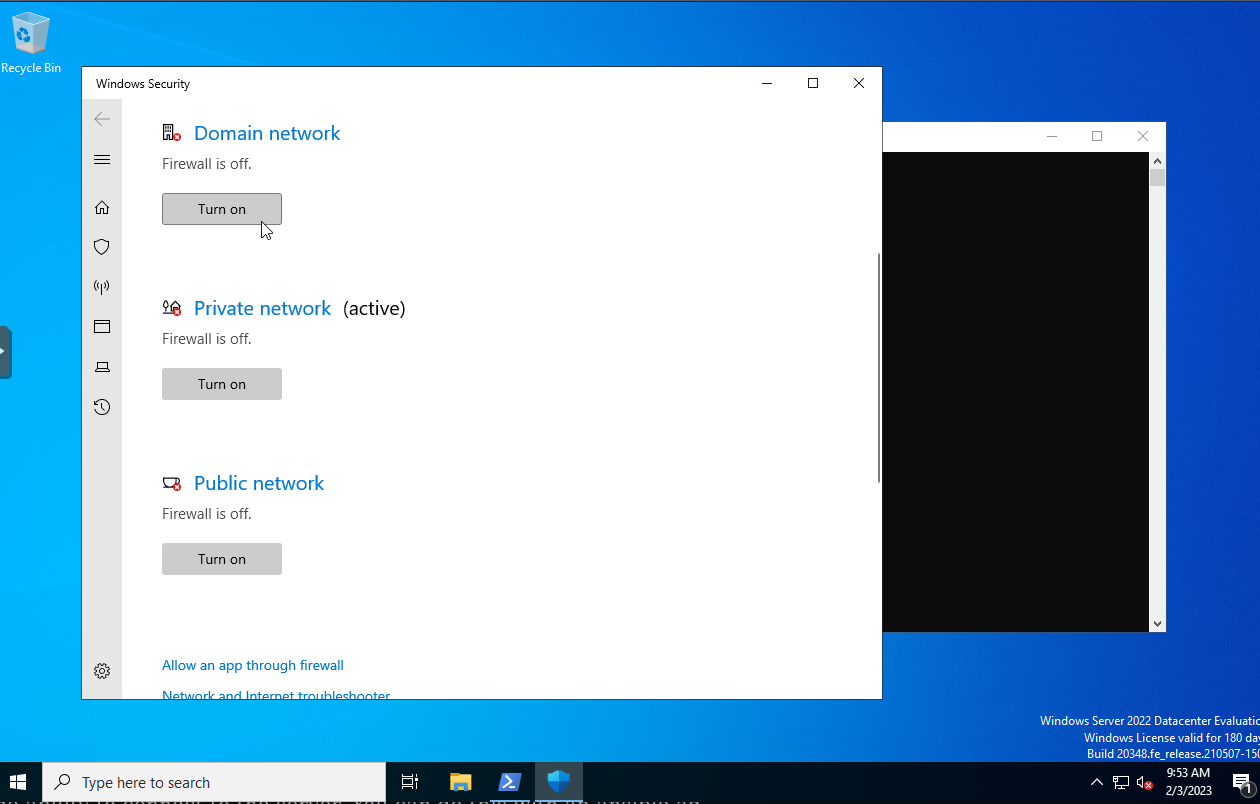
Next we'll need to disable Windows firewall. I know it sounds sketchy, but we can always configure it after the fact. This is just a template, and it allows us to configure it better remotely. The only time it will be on is to configure it anyway. In order to disable Windows Firewall, search for it and disable it for all three networks. Again, we can change this after we get the domain controller configured. Also, this is for a testing environment anyway.
WinRM and CredSSP
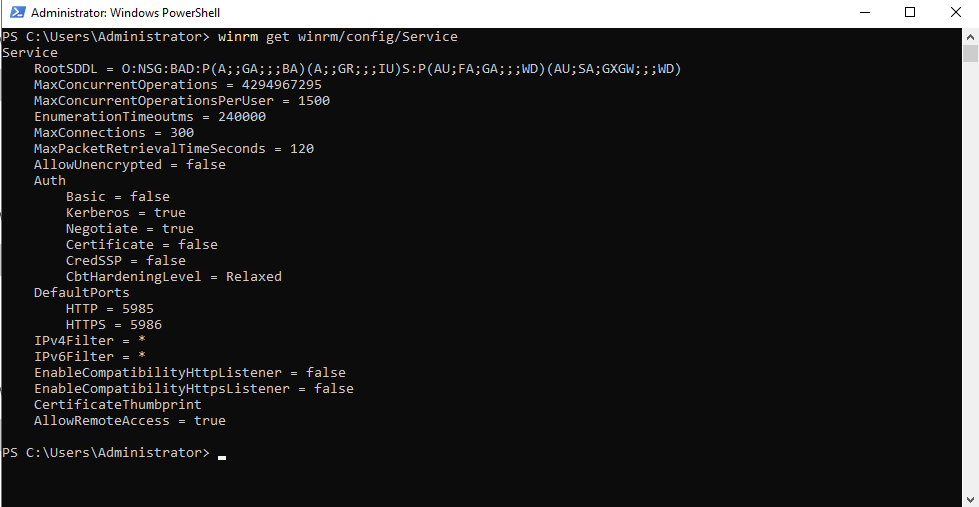
Finally on the Windows side of things, we need to make sure WinRM is configured properly. Here's more info from ansible's site. First we can get the WinRM info by typing winrm get winrm/config/Service.
This looks good, but I'd like to enable CredSSP since it's the newer protocol on the block and supports both local and domain accounts. It's just a simple one-line command to get it enabled anyway: Enable-WSManCredSSP -Role Server -Force. If you'd like some more info on the different authentication types you can find that here.
Update Windows
Last but not least, we should update the server. I thought that Windows would update during installation, but after checking updates on the server that does not appear to be the case.
Sysprep (NOT RECOMMENDED, SEE EDIT)
Edit Feb 9, 2023: After I made this post, I realized that this step is not necessary and actually makes it more difficult later on because of having to setup oobe on boot, thus making ansible connection difficult. While I don't recommend this for this project, sysprep is sometimes the best option. Feel free to skip this section.
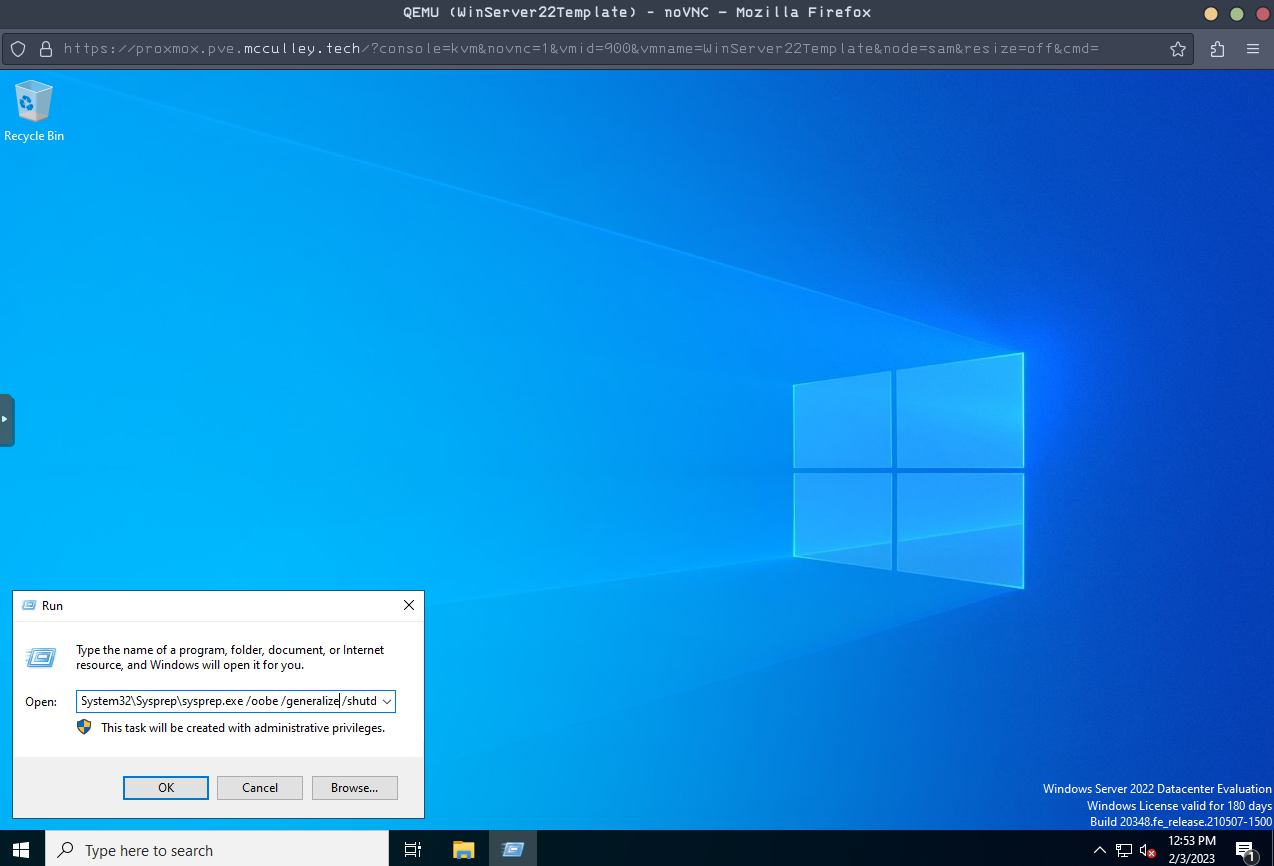
In order to have every deployment from this VM be unique, we need to run the following sysprep command. simply open a run prompt and type:
C:\Windows\System32\Sysprep\sysprep.exe /oobe /generalize /shutdown
Once the system is done running this command it will shutdown and is ready to be converted into a template by right clicking the VM and choosing 'Convert to Template'.
Ansible Control Node
- Make entry in hosts file
- Install proper Ansible galaxy collection
- Installed necessary python modules
Hosts entry
Ansible needs to know about the template server in the hosts file. This file is located in /etc/ansible/hosts. Here's a screenshot of the way I have my windows host setup. I also define some variables for my windows template host. Note that this is after making the entry for the Windows Server in the DNS server my ansible control node uses. Verify that your DNS entry is working by pinging the windows server with it's FQDN.
[windows]
<FQDN of Windows Template>

[windows:vars]
ansible_port=5985
ansible_connection=winrm
ansible_winrm_scheme=http
ansible_winrm_transport=credssp
ansible_winrm_server_cert_validation=ignore
Ansible Galaxy Collections and Python Modules
In order to connect to windows servers we'll need to install the proper ansible galaxy collection with the following command:
ansible-galaxy collection install ansible.windows
There are alos a few python modules you'll need to install. To be honest I'm not sure exactly which are needed, I made this after I got everything working. But I have a good deal of confidence these are the ones you'll need:
- pywinrm
- requests
- requests-credssp
All of these can be installed by running pip install <module>.
Test Ansible Connection
We should test out the ability to connect to the server. You can do this with an ansible ad-hoc command or with a playbook that can turn into your Domain Controller playbook. The ad-hoc command looks like this:
ansible -m win_ping <FQDN of Windows Template> -u Administrator -k

Once we've verified that we can connect to our server, we've got a template all setup for deploying our Domain Controller!